[ Swift UI 강좌 ] 4. 스위프트 iOS - 테이블 뷰 만들기
- Coding/스위프트 UI
- 2021. 2. 6. 18:14
Swift UI에서는 TableView는 어떻게 표현하는지 궁금해서 검색해보니 실제 테이블 뷰가 아니라 List라는 것을 사용하더군요. 사용법은 아주 간단합니다. 오히려 테이블 뷰를 사용하는게 민망할 정도로 쉽더군요. 테이블 뷰 델리게이터 이런거 필요 없습니다.
프로젝트 생성
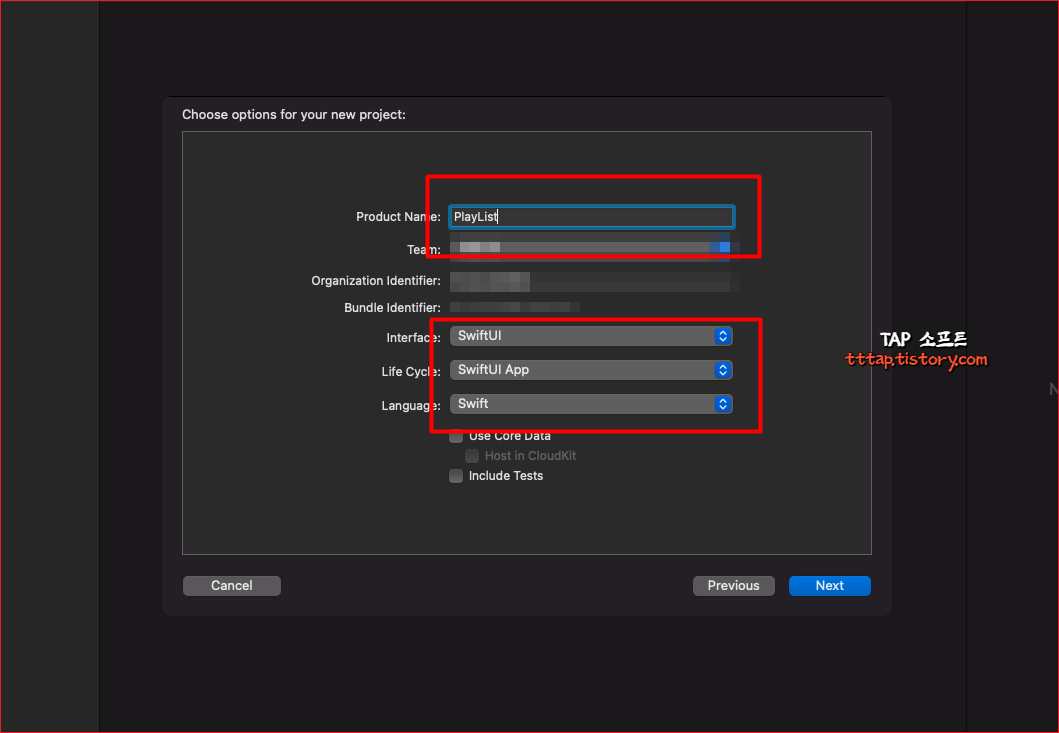
▼ 1. PlayList 라는 프로젝트를 하나 만듭니다. Swift UI, SwiftUI App, 언어는 Swift로 설정합니다.

▼ 2. 기존의 있는 기본 텍스트를 지우고 List() 를 하나 추가합니다. 정적으로 아이템을 계속 추가할 수 있습니다. 마치 테이블 뷰에 Static Cell 같습니다.
List(data.tracks) { track in
	Text("1")
	Text("2")
	Text("3")
	Text("4")
	Text("5")
}
데이터 생성
▼ 3. 화면을 렌더링하기 위해서 두개의 struct를 만들어 보겠습니다. Album은 tracks 라는 배열을 가지고 있습니다. 그냥 음악 트랙 정보입니다. 그리고 let data = Album()을 해서 객체를 하나 만들어줍니다. 그리고 List() 객체에 data.tracks를 넣어 줍니다. 그런에 에러가 나네요? identifiable 프로토콜을 구현한 객체가 와야 한다고 합니다.
struct Track: Identifiable {
    let id = UUID()
    let title: String
    let artist: String
    let duration: String

    let thumbnail = Image(systemName: "heart")
    let gradient: LinearGradient = {
        let colors: [Color] = [.orange, .pink, .purple, .red, .yellow]
        return LinearGradient(gradient: Gradient(colors: [colors.randomElement()!, colors.randomElement()!]), startPoint: .center, endPoint: .topTrailing)
    }()
}

struct Album {
    let tracks = [
        Track(title: "Cool Cat", artist: "Keyboard Cat", duration: "0:29"),
        Track(title: "The Lovecats", artist: "The Cure", duration: "3:40"),
        Track(title: "Katamari on the Moog", artist: "Akitaka Tohyama, Yu Miyake", duration: "0:33"),
        Track(title: "A Sunday Morning Meditation", artist: "ambientcat", duration: "1:17"),
        Track(title: "Here Comes Santa Claws", artist: "Jingle Cats", duration: "2:21"),
        Track(title: "Be a Safe Rider", artist: "Safe-T Rider", duration: "5:05")
    ]
}
struct ContentView: View {
    let data = Album()

    var body: some View {
        List(data.tracks) { track in
            Text("1")
            Text("2")
            Text("3")
            Text("4")
            Text("5")
        }
    }
}
▼ 4. Track 에 Identifiable 프로토콜을 구현해주고 id 값을 하나 추가해줍니다. UUID를 할당해서 자동으로 ID 가 생성되도록합니다.

▼ 5. 자 이제 테이블 뷰의 셀같은 것을 만들어 주겠습니다. TrackRow라고 해서 View 로 만들어 List 안에 넣어주면 모두 끝납니다.
struct TrackRow: View {
  let track: Track

  var body: some View {
    HStack {
      track.thumbnail
        .padding()
        .background(track.gradient)
        .cornerRadius(6)

      Text(track.title)
      Text(track.artist)
        .foregroundColor(.secondary)
        .lineLimit(1)
        .truncationMode(.tail)

      Spacer()

      Text("\(track.duration)")
    }
  }
}

▼ 6. 전체 코드입니다.
import SwiftUI

struct Track: Identifiable {
    let id = UUID()
    let title: String
    let artist: String
    let duration: String

    let thumbnail = Image(systemName: "heart")
    let gradient: LinearGradient = {
        let colors: [Color] = [.orange, .pink, .purple, .red, .yellow]
        return LinearGradient(gradient: Gradient(colors: [colors.randomElement()!, colors.randomElement()!]), startPoint: .center, endPoint: .topTrailing)
    }()
}

struct Album {
    let tracks = [
        Track(title: "Cool Cat", artist: "Keyboard Cat", duration: "0:29"),
        Track(title: "The Lovecats", artist: "The Cure", duration: "3:40"),
        Track(title: "Katamari on the Moog", artist: "Akitaka Tohyama, Yu Miyake", duration: "0:33"),
        Track(title: "A Sunday Morning Meditation", artist: "ambientcat", duration: "1:17"),
        Track(title: "Here Comes Santa Claws", artist: "Jingle Cats", duration: "2:21"),
        Track(title: "Be a Safe Rider", artist: "Safe-T Rider", duration: "5:05")
    ]
}

struct ContentView: View {
    let data = Album()

    var body: some View {
        List(data.tracks) { track in
            TrackRow(track: track)
        }
    }
}

struct TrackRow: View {
  let track: Track

  var body: some View {
    HStack {
      track.thumbnail
        .padding()
        .background(track.gradient)
        .cornerRadius(6)

      Text(track.title)
      Text(track.artist)
        .foregroundColor(.secondary)
        .lineLimit(1)
        .truncationMode(.tail)

      Spacer()

      Text("\(track.duration)")
    }
  }
}


struct ContentView_Previews: PreviewProvider {
    static var previews: some View {
        ContentView()
    }
}
'Coding > 스위프트 UI' 카테고리의 다른 글
| [ Swift UI 강좌 ] 5. 스위프트 iOS - 날씨정보 뷰 만들기 (0) | 2021.02.11 |
|---|---|
| [ Swift UI 강좌 ] 3. 스위프트 iOS - @State 속성 @Binding 속성 (0) | 2021.02.05 |
| [ Swift UI 강좌 ] 2. 스위프트 iOS - 네비게이션 이동하기 (0) | 2021.02.03 |
| [ Swift UI 강좌 ] 1. 스위프트 iOS - 버튼 이벤트 만들기 (0) | 2021.01.22 |


