
[ 스위프트 ] Vapor 프레임워크 몽고 DB 연결하기
- Coding/스위프트 Vapor
- 2021. 3. 26. 20:01
Swift에서 Vapor를 사용해보고 제일 먼저 해본 것이 데이터베이스를 연결해 본 것입니다. 우선 PostgreSQL은 잘 동작하는 것 같고 Vapor를 주로 테스트 용도로 사용할 생각이라서 MongoDB를 연결이 필요했습니다. 방식은 거의 비슷합니다. 모두 Fluent라는 라이브러리를 사용합니다. Vapor Docs 문서에 아주 상세히 기술되어 있으나 막상 문서만 보고 해 보면 막히시는 분들이 많을 것 같아 테스트해본 내용을 포스팅합니다.
목차
MongoDB 연결하기
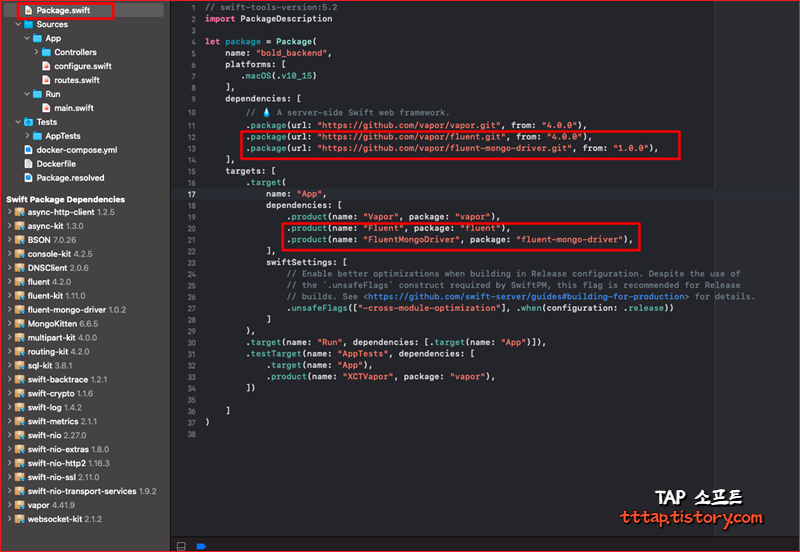
▼ 1. 두 개의 [ Fluent, ,FluentMongoDriver ] 라이브러리를 Package.swift 에 추가해줍니다. 처음 프로젝트를 생성하면 vapor에 라이브러리만 포함되어 있습니다.
// swift-tools-version:5.2
import PackageDescription

let package = Package(
    name: "bold_backend",
    platforms: [
       .macOS(.v10_15)
    ],
    dependencies: [
        // 💧 A server-side Swift web framework.
        .package(url: "https://github.com/vapor/vapor.git", from: "4.0.0"),
        .package(url: "https://github.com/vapor/fluent.git", from: "4.0.0"),
        .package(url: "https://github.com/vapor/fluent-mongo-driver.git", from: "1.0.0"),
    ],
    targets: [
        .target(
            name: "App",
            dependencies: [
                .product(name: "Vapor", package: "vapor"),
                .product(name: "Fluent", package: "fluent"),
                .product(name: "FluentMongoDriver", package: "fluent-mongo-driver"),
            ],
            swiftSettings: [
                // Enable better optimizations when building in Release configuration. Despite the use of
                // the `.unsafeFlags` construct required by SwiftPM, this flag is recommended for Release
                // builds. See <https://github.com/swift-server/guides#building-for-production> for details.
                .unsafeFlags(["-cross-module-optimization"], .when(configuration: .release))
            ]
        ),
        .target(name: "Run", dependencies: [.target(name: "App")]),
        .testTarget(name: "AppTests", dependencies: [
            .target(name: "App"),
            .product(name: "XCTVapor", package: "vapor"),
        ])

    ]
)
▼ 2. 만약 패키지를 새로 받지 못한다면 Xcode의 File > Swift Packages 메뉴에서 [ Reset Package Caches ] 를 선택해 초기화해줍니다.

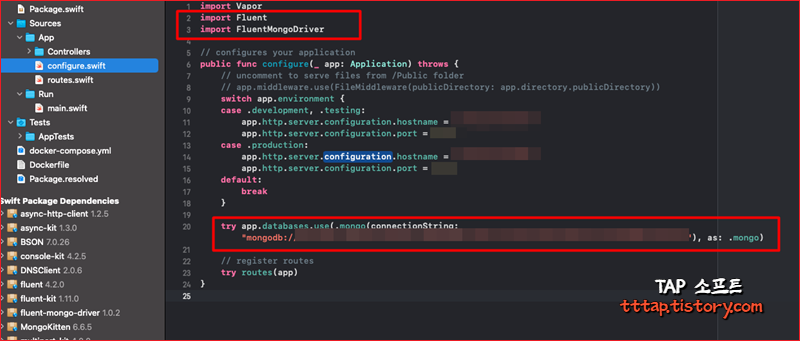
▼ 3. 가장 먼저 configure.swift 파일을 열고 [ Fluent, FluentMongoDriver ] 를 import 한 뒤에 다음 구문을 추가해서 데이터 베이스를 연결 설정을 해줍니다.
import Vapor
import Fluent
import FluentMongoDriver

// configures your application
public func configure(_ app: Application) throws {
    // uncomment to serve files from /Public folder
    // app.middleware.use(FileMiddleware(publicDirectory: app.directory.publicDirectory))
    switch app.environment {
    case .development, .testing:
        app.http.server.configuration.hostname = "192.168.0.111"
        app.http.server.configuration.port = 8888
    case .production:
        app.http.server.configuration.hostname = "192.168.0.222"
        app.http.server.configuration.port = 8888
    default:
        break
    }

    try app.databases.use(.mongo(connectionString: "mongodb://아이디:비밀번호@아이피/데이터베이스?authSource=admin&authMechanism=SCRAM-SHA-256"), as: .mongo)

    // register routes
    try routes(app)
}
모델 만들기
모델을 만드는 법은 다음 문서에 상세히 기술되어 있습니다.
Vapor: Fluent → Model
Models Models represent data stored in tables or collections in your database. Models have one or more fields that store codable values. All models have a unique identifier. Property wrappers are used to denote identifiers, fields, and relations. Below is
docs.vapor.codes
▼ 4. 저는 간단한 Sound라는 모델을 만들었습니다. 우선 Fluent를 임포트 해야 Model클래스를 사용할 수 있습니다. Sound는 두 개의 프로토콜을 구현합니다.
- Model : 데이터베이스 모델 프로토콜
- Content : 통신 요청을 반환하기 위한 객체 정의 프로토콜
import Vapor
import Fluent

final class Sound: Model, Content {
    // Name of the table or collection.
    static let schema = "tracks"

    // Unique identifier for this Galaxy.
    @ID(key: .id)
    var id: UUID?

    // The Galaxy's name.
    @Field(key: "name")
    var name: String

    @Field(key: "fileName")
    var fileName: String

    @Field(key: "fileType")
    var fileType: String

    @Field(key: "content")
    var content: String

    // Creates a new, empty Galaxy.
    init() { }

    // Creates a new Galaxy with all properties set.
    init(id: UUID? = nil, name: String, fileName: String, fileType: String, content: String) {
        self.id = id
        self.name = name
        self.fileName = fileName
        self.fileType = fileType
        self.content = content
    }
}
POST 요청 만들기
▼ 5. 두 개의 post 통신을 만듭니다. 하나는 생성, 다른 하나는 조회입니다. 간단히 설명드리면 생성을 위해서는 위에서 만든 모델의 스키마가 필요합니다. req.content.decode(Sound.self) 를 통해서 스키마를 생성하고 해당 스키마의 create 구문으로 데이터를 만듭니다. 또한 요청 객체에 들어있는 Json 형태와 맞지 않으면 에러를 출력하고 데이터가 만들어지지 않습니다. 즉, Node.js의 joi 같은 라이브러리를 쓰지 않아도 자동으로 Validation 처리가 가능합니다.
생성 (create)
app.post("addTracks") { req -> EventLoopFuture<Sound> in
        let sound = try req.content.decode(Sound.self)
        return sound.create(on: req.db)
            .map { sound }
    }
조회 (query)
app.post("tracks") { req -> EventLoopFuture<[Sound]> in
        let planets = Sound.query(on: req.db)
        return planets.all()
    }
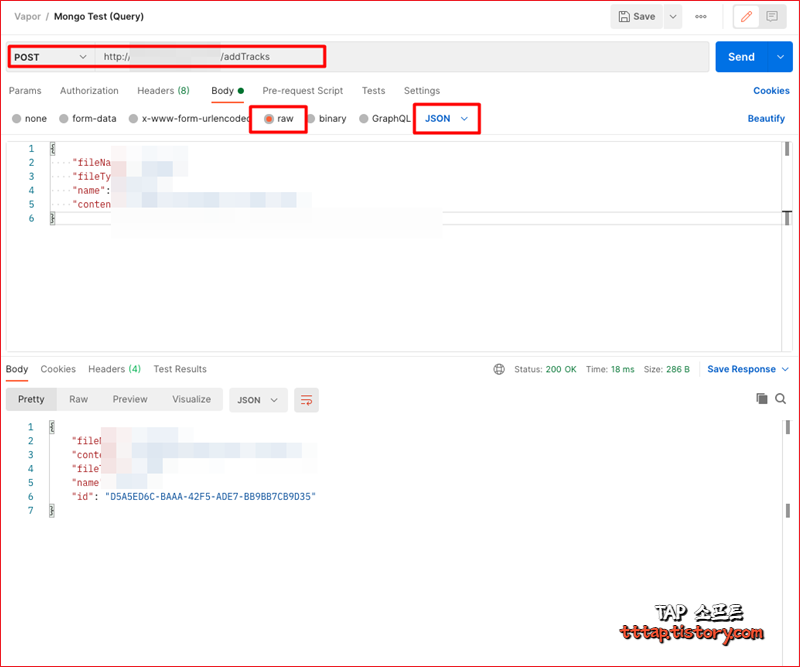
POSTMAN 테스트
▼ 6. 단순히 Fluent를 이용해서 조회를 하면 최초에 상당히 느리게 동작합니다. 15인치 고사양 맥북에서 동작했을 때보다. M1이 훨씬 빠르긴 하지만 최초에 무지하게 느립니다. 이유는 모르겠지만 아마도 mongodb 연결 드라이버에 문제가 있는 것 같습니다.

▼ 7. 조회 요청을 해봅니다.

▼ 8. 생성 요청을 해봅니다.
▼ 9. Xcode에 조회할 때마다 로그를 볼 수 있습니다.

다음 문서들을 보면 Fluent 전체의 구조를 대략 이해할 수 있습니다.
docs.vapor.codes/4.0/fluent/overview/
Vapor: Fluent → Overview
Fluent Fluent is an ORM framework for Swift. It takes advantage of Swift's strong type system to provide an easy-to-use interface for your database. Using Fluent centers around the creation of model types which represent data structures in your database. T
docs.vapor.codes
docs.vapor.codes/4.0/fluent/query/
Vapor: Fluent → Query
Query Fluent's query API allows you to create, read, update, and delete models from the database. It supports filtering results, joins, chunking, aggregates, and more. // An example of Fluent's query API. let planets = Planet.query(on: database) .filter(\.
docs.vapor.codes
'Coding > 스위프트 Vapor' 카테고리의 다른 글
| [ 스위프트 ] Vapor 8080 포트 변경하기 (0) | 2021.03.30 |
|---|---|
| [ 스위프트 ] Vapor 프레임워크 설치 및 구축 (0) | 2021.03.25 |

